
Not So Hot : Thermographic Imaging of a Newcastle Terraced House

I put my own house to the test with a Thermographic Camera and find it falling short!
Our recent post on thermal comfort, ‘How Warm Is Your House?‘, got me thinking about how well my own house performs. The first thing to confess is that I don’t live a low-energy house. Far from it! I have an ex-miner’s terraced house near Newcastle-upon-Tyne. Built in 1910, it’s a traditional build with brick walls and slate roof. A previous owner put in double-glazed uPVC windows. I’ve had the slim cavities (30mm) filled with insulation and have added 300mm of insulation to the loft. I thought I’d done just about everything I could without significant expense and disruption. Think again!
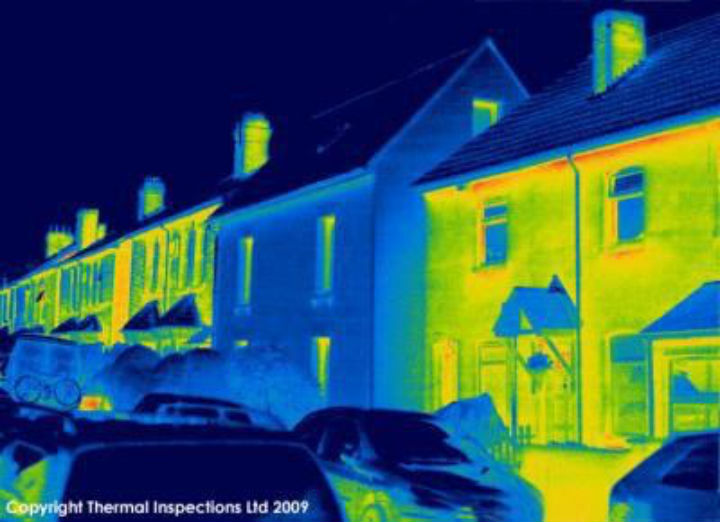
The thermographic camera forms its image from infrared radiation, so it’s a great way to measure variation in temperature across a range of surfaces. I took these images on a cold morning, soon after sunrise, so the images help us to understand where heat is escaping from the house. The temperature differential from inside to out was 16ºC.
-
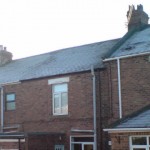
- Photo of Front Elevation
-
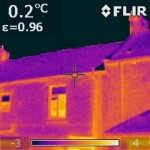
- Thermal Image of Front Elevation
Externally, the walls are a relatively even temperature suggesting that the blown cavity insulation is reasonably well distributed. Compare my house, in the centre of the picture, to my neighbour’s on the right which appears warmer on the surface. He hasn’t had his cavities filled yet and the greater heat loss is noticeable with the warmer surface temperature. The roof looks nice a cold thanks to the loft insulation.
-
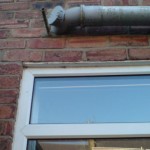
- Window and Soil Pipe
-
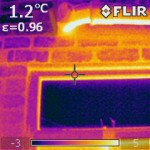
- Thermographic Image of Window and Soil Pipe
The steel lintel over the window isn’t insulated and the wall over the window is warmer on the outside as a result. The bright line beneath the brickwork highlights the toe of the steel beam supporting the masonry, indicating the heat is leaking here like a sieve. The same can be said for the soil pipe which comes out through the wall above the kitchen window and is being heated by hot water from my bathroom. The glass in the windows looks nice and cold, but the camera is deceptively reading a reflection of the cold sky.
-
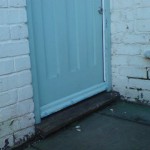
- Front Door
-
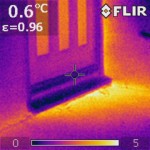
- Thermographic image of Front Door
The front door gave me quite a shock! The door sits in an extension out to the front of the house, and the door butts up to the original wall which runs continuously from inside to out. This explains the heat leaking around the side of the door through the masonry. Whoever built the extension also didn’t think to fit any edge insulation to the floor slab, and my heating system is keeping the front yard nice and warm!
-
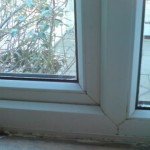
- uPVC Window
-
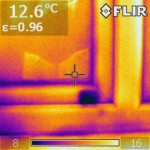
- Thermographic Image of uPVCWindow
Inside, the colours are reversed and the colder temperatures indicate heat escaping. The uPVC windows in the house must be 20 years old and the seals are beginning to fail. This image nicely shows the cold air coming in through a gap in one seal, chilling the frame. This wasn’t a surprise to me because I’ve been feeling the drafts all winter. Finding replacement seals for these old windows is proving tricky.
-
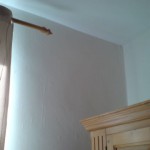
- Bedroom Ceiling
-
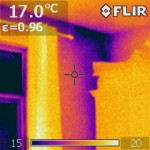
- Thermographic Image of Bedroom Ceiling
Upstairs, the loft insulation is compressed to an ineffectual thickness at the edge of the roof, where the slates run down to the gutter. This explains the cold temperatures at the ceiling edge along the wall with the window. However, the cold extends quite a way down the wall which was a surprise. My best guess is that the cavity insulation is incomplete here, or there is a bridge across the cavity on the line of the party wall.
-
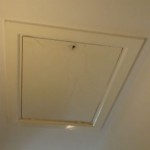
- Loft Access Hatch
-
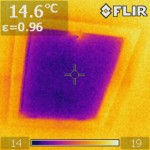
- Thermographic Image of Loft Access Hatch
Less surprising was the loft access hatch. I’ve draught sealed this, but the hatch itself is only plywood with a thin layer of polystyrene insulation on the rear which is offering negligible resistance to thermal bridging. The hatch is acting as a radiator in reverse, which helps to explain why the landing is so cold in Winter!
So there are some obvious items that I still need to work on. The window seals need replacing, and that loft hatch needs insulating properly. Other items would require a more disruptive and costly approach as part of a refit. How far can I go?
Simmonds Mills have demonstrated what’s possible with their EnerPHit certified refurbishment of Grove Cottage in Hereford. Here they used external wall insulation (EWI) which is undoubtedly the best way of cutting out all of those thermal bridges with limited disruption internally. The even colour across the facade shows just how successful they’ve been. As we look to upgrade our existing housing stock, this approach is going to have to become the norm. Tinkering with window seals and loft hatches just won’t do the job.
My thanks go to Apex Acoustics Ltd., Gateshead-based consultants offering acoustic design and air leakage testing, for the use of their FLIR B50 Thermographic Camera.

OUR FREE EMAIL NEWSLETTER

FROM THE ARCHIVES
-
Uncategorized
-

-
-

-

-

Uncategorized
Explore

Explore sustainable projects in the North East.
Atmospheric CO2
![]()
419.89 ppm (November 2023)
Feature series
![]()
![]()
